Using Python to Analyze Strava Data
Introduction
I've been using Strava to track my bike rides and other activities since the fall of 2015. There's a lot of data there that I'd like to store locally and analyze in ways that I can't easily do on the Strava website or app. In this post I describe Python code I've written that begins to let me do just that. So far, the code is able to
- download all of my activities on Strava and save them to a CSV file
- update that CSV with new activities without downloading anything that is already stored locally
- create a CSV file with summary data for each activity type.
- separate the activities by type (Ride, Hike, etc.) and create a CSV file for each type
- produce a CSV file for each activity type with summary stats by year
- use past performance to predict the average speed of a route based on its distance and elevation gain
I plan to add to the code as I think of features I want, but for now here's the link to the GitHub repository where it resides. You are welcome to download it and use it and/or adapt it to suit your needs. The trickiest part is Strava's OAuth 2.0 process which I describe next. Fortunately, you only need to go through that process once.
I should mention that this article helped me understand how to access the Strava API.
Getting Authorization
Before you do anything else, you will need to go through Strava's OAuth 2.0 process to get what are called access and refresh tokens in order to access your data on Strava. The file get_strava_tokens.py in my GitHub repository helps with this process.
Before you run get_strava_tokens.py, go to the Strava Developer site. There you will tell Strava about your code so that Strava can authorize it.
Click on the "Getting Started Button." Section A of that page gives some basic information about the Strava API. In particular it is rate limited. It allows up to 100 requests from an application every 15 minutes and no more than 1,000 requests per day. I have never come close to these limits.
Section B is where you create your application. The first step is just to create a Strava account which you probably already have. Next follow the instructions in Steps 2 and 3 in order to obtain the following which you should keep confidential:
- a Client ID for your application
- a Client Secret
- an authorization token which changes every six hours
- a refresh token which your code will use to get a new authorization token after it expires
Here's what you will do in Steps 2 and 3:
- Go to https://www.strava.com/settings/api which will take you to the My API Application page.
- On that page choose a category for your application (whatever you want)
- Leave Club blank (unless you have a reason not to)
- Note your Client ID, Client Secret, Access Token, and Refresh Token
- Specify a name for your application. You can name it practically anything you want, but there are a few guidelines that you have to follow. For example, it can't have Strava in the name.
- Specify a website for your app. This can be anything and doesn't even need to be real. It does, however, need to be a correctly formatted URL (https://www.example-app-website.com). Don't forget the "https://".
- Specify an Authorization Callback Domain. For our purposes, this should be localhost.
You can skip Section C.
Section D describes the OAuth 2.0 authorization process. It's not as complicated as it looks. Scroll down to just below the graph where it says "For demonstration purposes only.." and follow Steps 1 through 10. The only catch is that in Step 2, the example URL Strava provides does not grant sufficient access. Instead, you want to use this one (Remember to replace the client ID with your own):
http://www.strava.com/oauth/authorize?client_id=[REPLACE_WITH_YOUR_CLIENT_ID]&response_type=code&redirect_uri=http://localhost/exchange_token&approval_prompt=force&scope=profile:read_all,activity:read_all
The difference between this URL and the one in Strava's example is in the scope requested at the end of the link. The link above allows your application to read all of your activities and your profile. For more details, check out Strava's authentication documentation.
In Step 10 you will copy your authorization code.
At this point don't go to Step 11. That's where you exchange the authorization code and scope for tokens. Instead, use my file get_strava_tokens.py.
Edit get_strava_tokens.py. Replace the client_id, client_secret, and code fields in the dictionary called secret_stuff (first line of uncommented code) with your ID, secret, and authorization code (which you received at the end of Step 10 above). The ID is an integer; the other two are strings.
Make sure that you have the requests package installed and then run:
python3 get_strava_tokens.py
This will create a file called strava_tokens.json that contains the tokens. The script will also create a file called secret_stuff.json that holds onto your credentials. The file strava.py will use both of these.
That's it for authorization. As I said before, you will only need to go through the above process once. After you have the tokens, you are all set to download and analyze your data as much as you want.
Getting and Analyzing your Data
Once you've completed the OAuth 2.0 process, you can ignore get_strava_tokens.py and focus on strava.py and get_strava_activities.py. You'll also need the file __init__.py in the same directory as the other two so that Python knows where to look for strava.py when get_strava_activities.py imports it.
Make sure you have the following packages installed:
- Pandas - the code relies on pandas DataFrames heavily for manipulating the data
- requests - for making calls to the Strava API
- dateutil - for handling human readable dates
- pytz - for timezone support
- matplotlib
- numpy
- scipy
- scikit-learn
The last four are necessary for the method predict_avg_speed(). Unfortunately, they can take a long time to load.
To download all of your Strava data and split it apart into various CSV files, run
python3 getStravaActivities.py
The first line of code when you run the above command, creates a StravaAnalyzer object which is defined in strava.py. When you create a StravaAnalyzer for the first time, it downloads all of your activities from the beginning of time (January 1, 1970) to the present and generates several CSV files. The first is strava-activities.csv which holds all of your activities. It then generates a CSV for each activity type you've recorded (example: Ride.csv, Hike.csv, Kayaking.csv, etc.). It also generates a high level summary CSV file called strava-summary.csv and creates a file with annual statistics for each type (Ride-by-year.csv, Hike-by-year.csv, etc.).
As long as you don't delete strava-activities.csv, the next time you create an instance of StravaAnalyzer, it will check for new activities, append them to strava-activities.csv and regenerate the other CSV files. If you do delete strava-activities.csv, it downloads everything again for you.
If you'd like see to what profile information Strava stores for you, uncomment the next line of code in get_strava_activities.py. Now running it will produce a file called profile.csv which contains all of the your profile information.
Finally, if you are a cyclist and want a prediction of your average speed given the distance and total elevation gain of a route, run the method predict_avg_speed(). Uncommenting the first call of this method in get_strava_activities.py runs an example in Imperial units (feet of elevation gain and miles of distance). The second call is the same ride but in metric units (meters of elevation gain and kilometers of distance). See below for more details about this method. Edit 7/15/2021: This method now works for arbitary activity types. See the README for details.
How the Code Works
strava.py defines the StravaAnalyzer class. When you create a StravaAnalyzer:
- The constructor opens
strava_tokens.jsonwhich was created during the OAuth 2.0 process and checks if the tokens have expired. - If so, it generates a request for new access tokens using the refresh token and updates the file
strava_tokens.json. See Strava's Documentation for more information. - Next the constructor calls
get_all_activities(). With no arguments this method downloads all of your activities if it hasn't already or simply updates the file calledstrava-activities.csvwith any new activities. See below for more details on this method. - Finally, the constructor calls
separate_activity_types()to create a separate CSV file for each activity type you've ever recorded on Strava as well as a year-by-year summary of each type and a high level summary of all of your activities. See below for more details on this method.
Details on get_all_activties
This method uses pandas DataFrames to handle your Strava data. Its primary purpose is to download all of your strava activities and keep them up to date. However, you can also use it to download a subset of the data by specifying start and end dates. You can also specify a file name for the CSV file it creates. Note that all dates are assumed to be UTC.
For example, to download your activities from June 2021 only, you could run the following: sa.get_all_activities(start_date="June 1, 2021", end_date="July 1, 2021", csv_file="June-2021.csv").
Make sure to include a name for the CSV file so that you don't accidentally overwrite strava-activities.csv. Also, if you do want to overwrite the existing CSV file set the overwrite flag to True.
If you look at the code in get_all_activities(), you will see that I add columns to the pandas DataFrame that holds the activity data. This occurs after the while loop in which the API calls are made. Most of these are things like specifying elapsed time in minutes or converting meters to feet or meters to miles. I also add metrics that let me see the average elevation gain of a ride. I include this in feet per mile and meters per kilometer. For me the average elevation gain is useful in thinking about how difficult my rides are. It's also used by predict_avg_speed(). You may want to add or delete metrics.
Details on separate_activity_types()
This method creates a DataFrame from strava-activities.csv. It then defines the statistics I want to see in my summaries and prints those summaries to CSV files. Feel free to adapt this method to your interests.
Details on predict_avg_speed
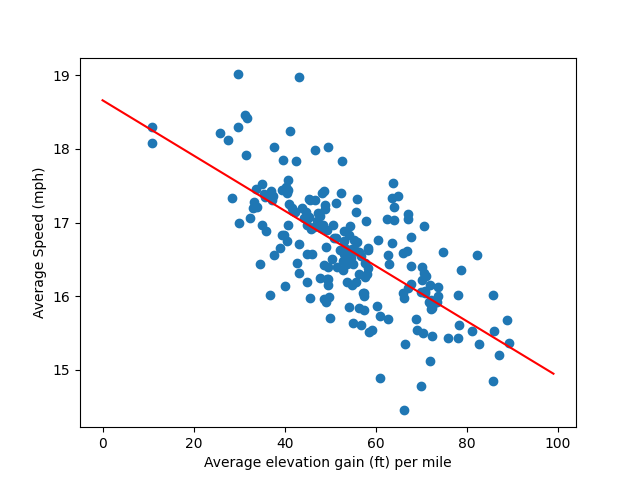
This method is a work in progress. It takes the total elevation gain of a proposed route (in either feet or meters) and the distance of that route (in miles or kilometers) in order to predict what your average speed in mph or kph will be as well as what the moving time will be. It does this by generating three different models (because I haven't decided on a best model yet). The first is based on a linear regression where the independent variable is the average elevation gain of a ride and the dependent variable is average speed. The second model is based on a multivariate linear regression using elevation gain and distance. The third model is simply the average of the average speeds of rides that are similar to the proposed route in terms of elevation gain and distance.
The method also creates a figure called AvgSpeedVsAvgElevGainImperial.png or AvgSpeedVsAvgElevGainMetric.png that shows a scatter plot of your average speed versus average elevation gain as well as the best fit line from the first linear regression. Here's what mine looks like using data from 2020 onward with rides short rides and slow rides I took with my family filtered out:
To use the method most simply, specify the elevation gain and distance of a ride in either feet and miles or meters and kilometers. The default is Imperial units. If you want to use metric, set the metric flag to True.
It's also possible to filter the data that is used in the generation of the models to include only relevant data. Specify a lower_speed_filter and a lower_distance_filter for example, if you want to filter out rides that are slower and shorter than your typical ride. For example, rides I take with my family are slower than my solo rides. I also find that it takes me around 20 miles to warm up fully. Therefore, I specify 14mph as my lower speed filter and 20 miles as my distance filter. When I want to see how long a ride with my family will take, on the other hand, I use upper_speed_filter and upper_distance_filter to filter out my solo rides.
You can also specify a year in which to start the model. I'd like to think that I'm faster now in 2021 than I was in 2015 and so choose either 2020 or 2021 as my model start year so that the models don't factor in my earlier, slower rides.
Lastly, there are two fudge factors that the third model uses to define what similar rides are. These are dist_fudge and elev_fudge. The defaults are both 0.1. This means that a ride is considered similar if it has a distance and average elevation gain within plus or minus 10% of the those of the ride you are interested in. I find that 0.1 often works well, but for some distance and elevation profiles it only generates a few similar rides. In that case, I increase the factor somewhat.
Edit 7/15/2021: This method now works for arbitary activity types. See the README for details.
For example, when I map out a route, Strava provides an estimate of how long that route will take based on my average speed over the last four weeks. However, not all rides are the same. On rides with a lot of elevation gain my average speed is understandably lower than it is on flat rides. Also, rides I take with my kids are slower and shorter than rides I take solo. I'd like to be able to produce statistics for the different types of riding I do and make predictions based on them.